A greenhouse is a major investment in your garden, so you’ll want to ensure it works effectively and lasts for the long term by installing it properly.
Firstly, this means preparing a proper greenhouse base in advance of your greenhouse’s delivery.
Editor’s Note [18.08.23]: Our guide about how to build a greenhouse base was originally published on April 23, 2020. Today’s update is sizable with new information about perimeter bases, and an entirely new section "How to build a greenhouse base - step by step" as well as extra details in the doors section as well as other updates too.
Choosing a greenhouse base – is it necessary?
Yes, it’s absolutely essential and we explain how to build a greenhouse base below.
Banish any thoughts of assembling your greenhouse directly onto a soil base or turf as it will make the base unstable and it won’t take long for it to slip, sag and slump. When you plant directly, the glass will likely crack, metal buckle, wood rot and door jam, leaving what should be a decades-long investment fit for nothing but the scrap heap.
The major requirement of a greenhouse base is that it is solid, level, and stable. As you can build your own or buy one readymade, let’s take a look at both options for greenhouse base installation.
Planning for greenhouse base construction
Before building the base, you should pick a suitable position for it, in general, the south side of a garden receives the most sunlight. Remember that you’ll need to have sufficient room around the perimeter of the greenhouse to clean and maintain the structure. To give you an idea of the minimum space required, you should be able to get a wheelbarrow right around the outside.
Leaving this space has the added benefit of allowing air to circulate, which reduces the risk of moss and algae growth.
Once you’ve decided on the position, it’s time to begin greenhouse base construction. A greenhouse base has two parts:
- First is the plinth. This raises the greenhouse a few centimetres above ground level.
- Next comes the actual flooring of the greenhouse. Popular options are concrete slabs, a concrete pad, or a central path of slabs with a soil border on either side of it. Take your pick and do not forget expansion bolts to hold larger greenhouses in place.
Opting for a perimeter base
A perimeter base is a type of greenhouse foundation that involves creating a raised structure around the perimeter of the greenhouse. This base provides additional support and stability to the greenhouse structure, making it more resistant to shifting or settling.
Perimeter bases can be made of wood, concrete, breeze blocks, or brick and are designed to elevate the greenhouse slightly above the ground level surface, allowing for better air circulation and good drainage. It also helps to prevent water from seeping into the greenhouse, reducing the risk of water damage and rot. Overall, a solid perimeter base is a popular choice for greenhouse owners seeking a reliable and durable foundation option.
Greenhouse foundation options
When completing your greenhouse base installation, choosing a suitable foundation is essential for its stability and longevity. One popular option is using paving slabs as a greenhouse base. Alternatively, readymade plastic greenhouse bases are available, we now discuss these options.
Using slabs as a greenhouse base
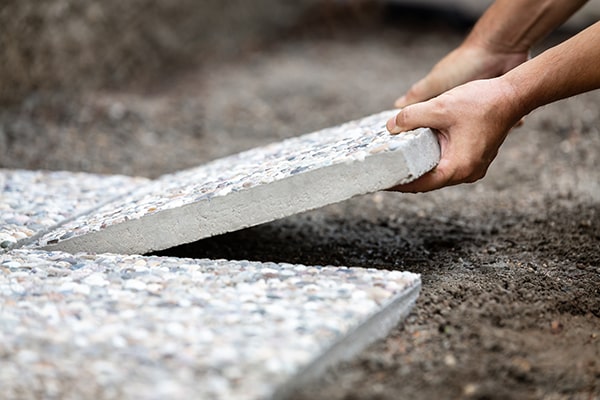

The first of our greenhouse foundation options are slabs. To use slabs, make sure the soil underneath is compacted, completely level and screed off with sand or pea gravel. Then you can either lay the slabs dry (not using any mortar) or wet (using blobs of mortar at the corners and one in the middle of each slab).
Be warned, paving slabs are thick and heavy, making them a challenge to manoeuvre, so it’s a good idea to enlist some help. On a positive note, once laid correctly, this means slabs make an excellent greenhouse base.
Remember to use a spirit level and avoid standing on the slabs until the mortar has set.
Other types of greenhouse base installation materials
Bricks can also be used to create a solid base but be wary of using reclaimed materials as they may be prone to flaking and cracking over time. Also, you could opt for a metal base.
Our readymade plastic greenhouse bases
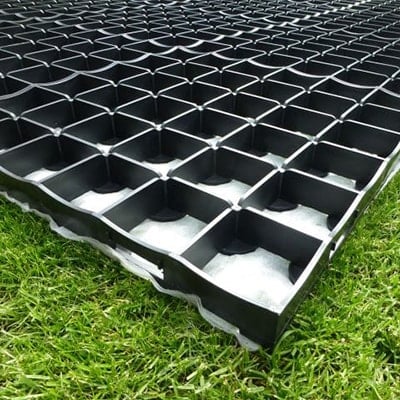

If you don’t want the hassle of laying slabs or creating a concrete base from a cement mixture, why not buy from our collection of readymade plastic base kits? They are the most cost-effective option and keep a greenhouse level and supremely stable. In addition, they provide excellent ventilation, drainage (there is no need for drilling drainage holes to clear standing water), and protection from ground moisture. They are also simple to reposition, if required and make great greenhouse foundation options.
Our cost-effective plastic greenhouse base options come in a range of sizes and are made of a sturdy, heavy-duty membrane paired with a robust and interlocking plastic grid system that is intended to be filled with pea gravel.
How to build a greenhouse base - step by step
Listed below are the steps which lead to the final greenhouse base construction.
1) Unpacking and preparing the kit
Choose the appropriate size and unpack the kit.
2) Ground preparation
Prepare the ground where the base is to lie and ensure it is well compacted (by using a roller or a vibrating plate). Level out any hollows with builders’ sand, more soil or pea gravel. It is crucial to check the sizing of the base and mark it out on the ground using spray paint to ensure it will fit.
3) Laying plastic membrane
After completing the previous step, place the thick plastic membrane over the designated area for the base, and then position the grids on the membrane, securing them together to create a solid and sturdy framework.
4) Assembling the interlocking plastic grid system
Assembling the interlocking plastic grid system is a straightforward process that involves connecting the pieces to form a rigid and stable greenhouse frame. The interlocking design ensures a secure fit, providing excellent support for the greenhouse structure while allowing proper drainage and ventilation through the grid cells filled with pea gravel.
5) Filling the grid with pea gravel
Next, fill each of the cells of the base with pea gravel, resulting in a visually appealing and polished finish, as well as aiding stability and drainage.
Now you can get cracking on the greenhouse itself, happy in the knowledge that you have an effective base for your greenhouse.
Building your new greenhouse
Now that we have shown you how to build a greenhouse base, there are a few steps to building your greenhouse, each of which is detailed below:

In advance
We advise checking the weather forecast in advance of starting the job. Avoid assembling your greenhouse on a wet or windy day as adverse weather conditions will make installation a far more difficult job and could even lead to damaging your new greenhouse.
Seek help and support
Also, get some help. Building a greenhouse is a 2-person job as it involves handling large components.
Read the instructions and gather the tools needed
Unpack everything, lay it out on the ground and identify all of the parts. Carefully unpack all the components and organise them in a clear and accessible area. Check all the parts against the provided list to ensure that all of them are present. Proper organisation will save time and prevent confusion during the assembly process.
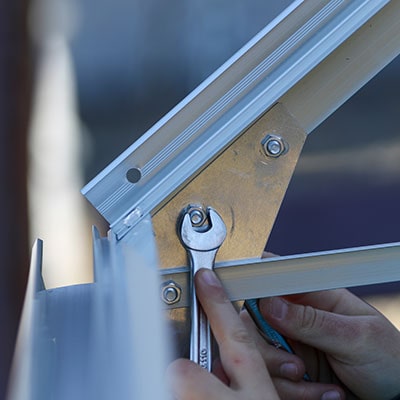
Take time to read the manufacturer’s instructions and make sure you have the necessary tools for the job. Familiarise yourself with each step before starting the construction. Gather all the necessary tools and equipment required for the assembly, such as screwdrivers, wrenches, and glazing clips, to ensure a smooth and efficient building process. Once you’re confident everything is in order, it’s time to build your greenhouse.
Taking care with the doors
Wear gloves and long sleeves, especially when fitting the glazing. Pay close attention to fitting the glazing and doors correctly. Follow the manufacturer's guidelines to ensure a tight and secure fit. Properly sealed glazing and doors are essential for maintaining a controlled environment inside the greenhouse and preventing heat loss. Once the door is in position, put draught proofing around it to prevent heat from escaping, plus check that your vents (such as louvres and roof vents) provide easy access and effective sealing when closed.
After assembly
It’s a good idea to check the doors are still hanging correctly after a few weeks, just to ensure they haven’t sagged.
Heating is a great addition to any greenhouse as it extends the growing season even longer. If you choose to install an electric heater, always employ a qualified electrician. Gas and paraffin heaters both make excellent alternatives.
Now you have your new greenhouse properly assembled and functioning, you’re ready to experience the joys of greenhouse gardening.
Conclusion
In conclusion, a proper greenhouse foundation is essential for the long-term success of your greenhouse. Building a solid foundation, which is level and stable is crucial to prevent damage and ensure smooth sliding door operation and your greenhouse's durability. The use of slabs as a suitable base offers a reliable option, but readymade plastic greenhouse bases are also a convenient choice. Whichever option you choose, following the proper construction steps and assembling your greenhouse with care will provide you with a thriving greenhouse gardening experience.
Final thoughts
Building a solid greenhouse base is a crucial step to ensure the long-term success and durability of your greenhouse. A solid, level, and stable foundation is essential to protect your investment and provide a thriving environment for your plants.
Whether you choose to use slabs or opt for readymade plastic greenhouse bases, following the step-by-step construction process and assembling your greenhouse with care will lead to a rewarding and enjoyable greenhouse gardening experience.
If you’re still in the process of choosing your new greenhouse, you’re in exactly the right place. We stock all of the latest designs, including those with a wooden and metal greenhouse frame, lean-to greenhouses, and various glazing options.
View our fantastic full range of cost-effective greenhouses for sale now.
Contact Shedstore about greenhouse base options
If you are still needing support about our greenhouse base options and to build a greenhouse base or with greenhouse base installation, Shedstore can help! We have provided an overview above, but our team can provide product and technical support in these ways:
- By calling - 0333 003 0518
- By emailing - these can be sent through our contact page form
- By text chat - using our live chat app


